When is a Defect Not a Defect? ASTM Glass Standards and the Luxury Building Industry
“It’s much more difficult to explain expectations around industry standards once the Owner has already seen the glass… and decided it is not acceptable to their personal expectations.”
As we’ve mentioned before in our recent Oversized Architectural Glass blog post, glass isn’t perfect. It’s a fact worth repeating because few things cause more heartburn, especially to contractors, than glass industry standards – especially when those standards don’t align to the client’s expectations.
Glass industry standards – we’re primarily talking about visible defects here – are set by the ASTM (American Society for Testing & Materials). Frankly, ASTM glass standards cover a wide variety of glass issues and it’s not easy to get to the heart of the matter… until the Owner has a meltdown, and then it’s a bit late.
Visible glass defects are the kicker in the luxury custom home niche. Expectations are high for everything, and glass isn’t perfect. The larger the piece of glass, the less perfect it is allowed to be.
The BIG Question: When is a defect not a defect?
Quick Answer:
- Move away from the glass.
- Stand back 10 feet.
- Face the glass straight-on at 90 degrees.
- View in daylight but not direct sunlight.
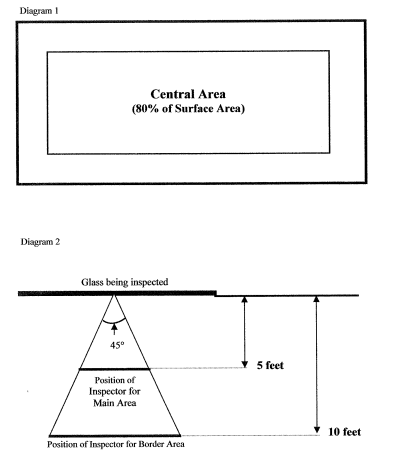
- Inspect the central 80% portion of the glass.
Under these conditions, if you can’t see it from 10 feet – it isn’t a defect.
That’s the short version.
ASTM’s Official Standards for Imperfections in Glass
The official ASTM version is longer. Although wildly entertaining, it can be a tricky plot to follow. We’ve included a brief summary in this article of some key parts of the ASTM. Keep in mind there are different types of defects with different inspection rules.
The 10’ rule is a good way of educating the Owner that ASTM standards for glass exist. As with most things, the 10’ rule isn’t definitive. For example, on sealed units over 35 square feet, the glass is allowed to have three 1” scratches and still be within standards – even if those scratches are visible from 10’.
Ninety percent of ASTM conversations never have to happen. If the client or Owner knows the short version of the inspection, discussed in the early stages, you’ll just have to get your entertainment elsewhere.
Here’s an email we received from a client of ours in response to some similar points we made in our Oversized Architectural Glass blog:
“What usually happens is the client sees something – it is within manufacturing standards and not covered – builder replaces glass at their expense.
I have been on a project for Contractor “X” where they spent 15K to replace glass which met standards but was rejected by the customer and it was taken out of what would have been a profit for the job. Keep writing informative articles – hope to see more soon”.
This happens too often and it is the contractor who bears the brunt of the problem (and the cost, unfortunately). It’s much more difficult to explain expectations around industry standards once the Owner has already seen the glass… and decided it is not acceptable to their personal expectations. It isn’t a simple product issue now, it’s an emotionally-charged issue revolving around expectations, reputations, and re-scheduling stress– you name it. These are far more difficult to resolve to everyone’s satisfaction.
Let’s take a Zen moment on this whole glass thing. Glass is like a butterfly. A butterfly alights on a flower across the yard. It’s a delicate thing of beauty, adding to the panorama of the landscape. It enhances and is part of the visual experience.
If you walk up close to that butterfly, stick your face right into his face, the perception may change. Up close is different than from further away – same goes for glass.

“GLASS IS LIKE A BUTTERFLY. A BUTTERFLY ALIGHTS ON A FLOWER ACROSS THE YARD.
IT’S A DELICATE THING OF BEAUTY, ADDING TO THE PANORAMA OF THE LANDSCAPE. IT ENHANCES AND IS PART OF THE VISUAL EXPERIENCE.
IF YOU WALK UP CLOSE TO THAT BUTTERFLY, STICK YOUR FACE RIGHT INTO HIS FACE, THE PERCEPTION MAY CHANGE.
UP CLOSE IS DIFFERENT THAN FROM FURTHER AWAY – SAME GOES FOR GLASS.”
Anyone can find imperfections or distortions in glass if they look close enough and hard enough. Glass is meant to be looked through, not at.
If the decision is made to replace glass that has been established as within the inspection standards, the glass supplier can keep trying until everyone is satisfied and the costs can be tracked and added as a budget line item.
Contractors and their window and glass suppliers need to work together. Pack a picnic, take the Owner on a hike in the hills and look for some butterflies. Take a magnifying glass and repeat over and over “Glass is like a butterfly – a thing of beauty. But it isn’t perfect”.
Glass isn’t perfect. Look through it rather than at it.
MANAGE THE EXPECTATION!
Now onto the “meat and potatoes…”
ASTM International is the basis for understanding glass and coating quality, allowable defects, and visual inspection criteria. ASTM has many different specifications and classifications depending on the type of glass being analyzed or quality controlled. Some examples of coating quality criteria are:
- ASTM C 1036-16 (Standard specification for flat glass) Q3 / Glazing select specifications or better
- ASTM C 1048-92 (Standard specification for heat-treated glass – kind HS, kind FT coated and uncoated glass) specifications using Q3 quality or better
- ASTM C 1376-97 (standard specification for Pyrolytic and vacuum deposition coatings on glass) kind CV specifications or better.
Before pointing out defects and imperfections, understanding ASTM inspection criteria is very important. It outlines things such as inspection distance, lighting requirements, inspections times etc.

Glass isn’t perfect. Look through it rather than at it.
Examples of Visual Inspection criteria
- Glass shall be inspected in the central (see illustration and categories below) area in transmission at a distance of 5 feet from the observer, and in reflection at a distance of 10 feet from the observer.
- Glass shall be inspected in the border area in transmission and reflection at a distance of 10 ft from the observer.
- Glass must be inspected using a viewing angle of 90 degrees from the glass with suitable background light (daylight without direct sunlight or a range of 500 – 1000 foot lamberts.) If a lighting box is used as a light source, the diffusing plate shall be parallel to and at a distance of 10 ft from the glass.
- Inspection should not exceed viewing of more than 5 seconds for lites up to 6 square feet, 10 seconds for lites up to 35 sq ft, and 20 seconds for lites larger than 35 square feet, either in transmission or reflection.
- If defects are visible beyond what is allowable as listed by sizes (square feet) below using the inspection criteria, the glass may be rejected.
“Ninety percent of ASTM conversations never have to happen. If the client or Owner knows the short version of the inspection, discussed in the early stages, you’ll just have to get your entertainment elsewhere.”
ASTM Standards for Glass: Allowable Defects
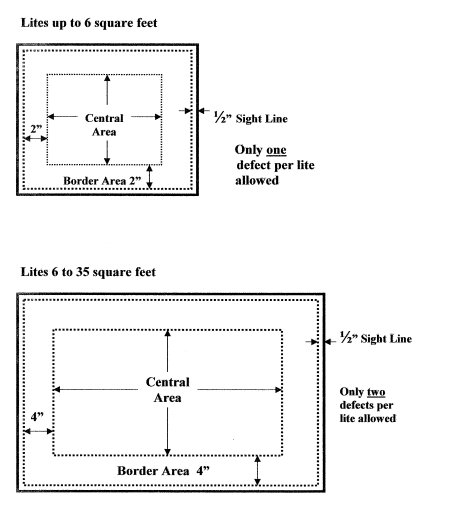
a) Single (individual) lites up to 6 square feet.
- Scratches – Viewable as stated above must be 1” or less. No more than 1 is allowed per lite.
- Debris, Dirt, Spots – Viewable as stated above, must be 1/16” or less. No more than 1 is allowed per lite.
- Seeds, Bubbles, Knots, Stones – Viewable as stated above, must be 1/16” or less. No more than 1 is allowed per lite.
- No more than 1 total viewable defect as described above is allowed per lite.
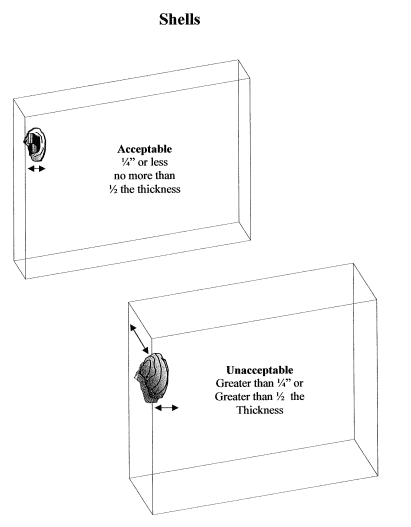
- Shells – No more than ¼” from edge less than ½ the thickness of the lite. No more than 1 per side.
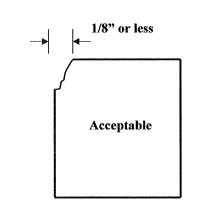
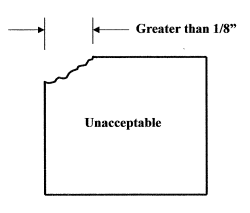
- Chips – No more than 1/8” from the edge. No more than 1 per side. (see illustration for chips.)
- Coating – Must be uniform on the lite inspected when viewed in transmission using the inspection criteria previously stated above.
- The border area is comprised of 2 inches plus ½” from each edge of the lite. All other area is the central area (see illustration.)
b) Single (individual) lites 6 to 35 square feet.
- Scratches – Viewable as stated above must be 1” or less. No more than 2 are allowed per lite and must be separated by a minimum of 24 inches.
- Debris, Dirt, Spots – Viewable as stated above, must be 1/16” or less. No more than 2 are allowed per lite and must be separated by a minimum of 24 inches.
- Seeds, Bubbles, Knots, Stones – Viewable as stated above, must be 1/16” or less. No more than 2 are allowed per lite and must be separated by a minimum of 24 inches.
- No more than 2 total viewable defects as described above are allowed per lite.
- Shells – No more than ¼” from edge less than ½ the thickness of the lite. No more than 1 per side.
- Chips – No more than 1/8” from the edge. No more than 1 per side. (see illustration for chips.)
- Coating – Must be uniform on the lite inspected when viewed in transmission using the inspection criteria previously stated above.
- The border area is comprised of 4 inches plus ½” from each edge of the lite. All other area is the central area (see illustration.)
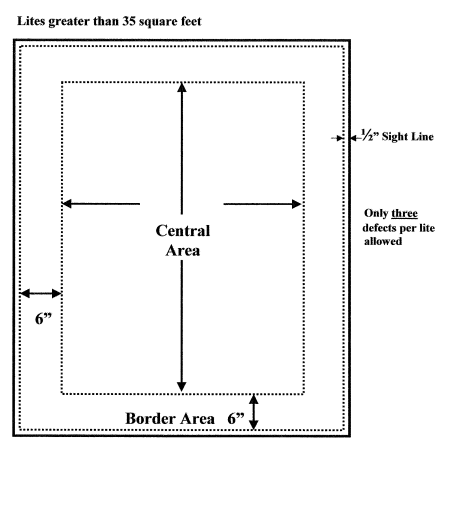
c) Single (individual) lites over 35 square feet.
- Scratches – Viewable as stated above, must be 1” or less. No more than 3 are allowed per lite and must be separated by a minimum of 24 inches.
- Debris, Dirt, Spots – Viewable as stated above, must be 1/16” or less. No more than 3 are allowed per lite and must be separated by a minimum of 24 inches.
- Seeds, Bubbles, Knots, Stones – Viewable as stated above, must be 1/16” or less. No more than 3 are allowed per lite and must be separated by a minimum of 24 inches.
- No more than 3 total viewable defects as described above are allowed per lite.
- Shells – No more than ¼” from edge less than ½ the thickness of the lite. No more than 1 per side.
- Chips – No more than 1/8” from the edge. No more than 1 per side. (see illustration for chips.)
- Coating – Must be uniform on the lite inspected when viewed in transmission using the inspection criteria previously stated above.
- The border area is comprised of 6 inches plus ½” from each edge of the lite. All other area is the central area (see illustration)
Visual Inspection Criteria Visual Aid
ASTM Standards for Glass: Allowable Defects Visual Aid
Understanding Glass Chips and Shells
Glass Chips
Glass Shells
